Tuesday, January 31, 2012

Leadership Classes - Why Women Buy

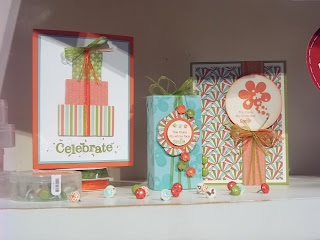
Before I go into some of the class information that I learned, I wanted to share another wonderful sample that showcases Sale-a-Bration!  Lookie at this adorable card.  I love all of the bright colors used here, and how Celebrate is colored in (you could use Stampin' Write Markers, or if you don't have those, a blender pen and ink pads would work well too).  If you place a $50 order, you can choose the Outlined Occasions Stamp set as your FREE item, a set of 6 stamps.  Click HERE to place your order!

While Leadership is a ton of fun, and we get spoiled with great food, prizes, and swaps, it is also loaded with training to help us grow our business.  Leadership has been a great motivator for me to go out and try to make a few friends, and to get a workshop or two onto my calendar.  Moving always causes my business to just about come to a stand-still, and I have been stuck in my shell longer than usual this particular move, so now it's time to get myself out there!

One of the classes I attended was called Why Women Buy....  Carrie Cudney did a great job of showcasing some of the key points of why women may choose to buy from a demonstrator, instead of a chain retailer.  The main thing is RELATIONSHIPS.  We women need each other....I remember when I had 4 very young children, (ages 5, 3, 1, and newborn), we made a major move to Memphis.  I actively sought out ways to build relationships.  I joined 2 MOPS (Mothers of Pre-Schoolers) groups, which is probably against the rules, and a Bible Study so that I was guaranteed to be out of my house, and with other women at least 7 times a month!

 
 I look back on that time, and can smile, because even though it was challenging, I made some wonderful friendships that have lasted through 3 more moves...in fact, last year I was able to have a mini-reunion with Jennifer, a mom in Memphis with 4 kids the same ages as mine, because she was willing to come to Nashville for a night so we could visit while I was at Leadership!  Jennifer still orders from me at times, even though I've encouraged her to find another demonstrator near to her.  I think it is because she hasn't had as close a relationship with the demonstrators she has come in contact with .
  The next point Carrie pointed out, was that we tend to look for that "perfect solution" or that "terrific time saver." I do that in more than my crafting; I do that in my daily chores....cooking, cleaning, laundry, and more. That's why we love our Big Shot, and the Punches, and Stampin' Up!'s coordinating colors, stamp sets, and accessories. By taking out the guesswork (will this red ribbon match my red paper?), Stampin' Up! has made this part easy for us, by offering lots of coordinating products.


 If you are a customer of mine, you might want to skip all this and go to the stamping samples, but if you are a demonstrator that didn't attend Leadership, or that couldn't take Why Women Buy, then I hope you find Carrie Cudney's points, and my examples helpful.  Be yourself, be encouraging, and be available to your customers, and they will be supportive of you as well.


Let's finish this off with one more example showcasing Sale-a-Bration products!  One of my roommates received this card as a swap, and the creator of this card mentioned that this is a great way to use up your scraps!  I do not know the name of this technique, but I'll revisit this one sometime, and give you the details...but you could probably try your hand at playing with your scraps to create this look yourself...you can do it!!! This card features the Hearts Collection Framelits, and Sale-a-Bration DSP. Have a blessed day, bec
Sunday, January 29, 2012

Leadership 2012 Highlights

This was my second time attending Leadership.  I feel very blessed to have the opportunity to go train and discuss ideas with women that love paper crafting, and all things Stampin' Up! like I do!  This is the crew that I hang out with for the week.  Starting at the left, we are, Michele, Diane, Monika, Me, Fran, and Linda.  These ladies were fun to be around, and very easy going, which is important in a roommate!

 Here are just a few of the beautiful project ideas that Stampin' Up! had set up for display.  It was a beautiful area, full of ideas...I took many many pictures, but will try to pull out my favorites... I will be blogging about Leadership for the next week or two, but could easily talk about it for a month or so!
 I'm sad that this picture is a little blurry, but I wanted to share this one anyway.  Those flowers are made with our new Fashionable Hearts Embosslits Die.  The die embosses and cuts at the same time, so the hearts have some texture to them.  I will likely create a card or project with this idea in the near future, but if you have this die already, you don't have to wait to make one of your own!
We arrived in San Antonio on Tuesday, the 17th, and our first day of Leadership was Wednesday.  We had Make-and-Takes in the morning, and then had most of the remainder of the day to roam around the city.  So we went to see the Alamo.  It was a beautiful day!

Here we all are at a cannon in the courtyard around the Alamo.  It was very sunny, but it was our coldest day while we were there.  I had left my winter coat (a very thin light one that I had bought for the trip) behind, because the coldest day was only 62.  But it was chilly being outside all day, so Linda loaned me her sweatshirt for the day.  That was just what I needed to take the edge off the cold!  Thanks, Linda!

Wednesday, January 25, 2012

Framelits Valentine


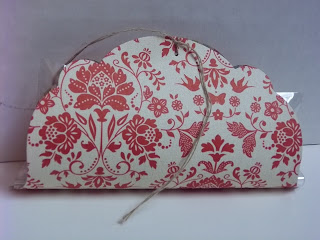
These Valentine Treats are quick and easy!  And oh so cute!
I made them using the largest Framelits Die in the Labels Collection.  I got the idea from the front cover of the Occasions Mini Catalog. 
Let me show you what holds the candies... First, take Stampin' Up!'s Clear Envelopes, seal them, and then CUT THEM IN HALF!  This gives you two little cello bags that are just the right width to fill out the treat holder.


Put 6 Hershey Kisses in the envelope half, and then roll it down a little, and staple it closed.

Next, cut out the framelits.  You can get 4 framelits from each sheet of DSP.  As you can see, the envelopes are wide enough to fill out the treat holder. 
Take a mini glue dot and attach it to the stapled side of the clear envelope.  Attach the envelope to the framelit to keep it from sliding out of the holder.


Punch a hole with the 1/16th punch.  Then curve the edges up, thread the holes with Linen Thread, and tie it closed.  Leave your linen thread some length so that you can later tie a bow.

Stamp the Hearts from the Take it to Heart stamp set, with Poppy Parade ink onto Very Vanilla cardstock.  Using the Hearts Collection Framelits, cut your hearts out. (sorry, I know that sounds bad). 

To make the tags, stamp love onto a scrap of very vanilla, then punch it out with the jewelry punch,  Put a hole in the tag to attach it with the linen thread.

I also punched a little hole into the largest heart, and threaded the linen thread through it to make the heart stand up.  This worked great, but I still added a drop of Tombow glue to keep it in place for the trip to San Antonio.  The little heart was added with a glue dot, and another heart attached from the Fashionable Hearts Embosslits.


Here is a side view, and you can scroll back up for the front view again.

If you place an order for the:
Hearts Collection Framelits - $26.95
Take it to Heart stamp set - $23.95

Then you will have earned a FREE Sale-a-Bration item, and can get that gorgeous DSP to make lots of Valentine treats this year!

You can order here, at my website.

Tuesday, January 24, 2012

Nugget Box Simply Scored

 Lookie at these!  I am quite proud of this creation of mine, but I really can't take the credit.  I got this project idea from my downline, Angie Kabina.  Angie gave me an adorable box of chocolates a few months back, and I gave her the greatest compliment a paper-crafter can give....I tore that box apart to find out how to make one of my own!  Keep reading, and I'll show you how I made it, and I'll add a few more photos once I get them taken to clarify the instructions....


 First, I started with a 5X7 piece of DSP (Designer Series Paper).  This way, you can make 3 boxes out of one sheet. 

Don't you just love this paper?  You can get it FREE until March 31st, by ordering from my website.  Right now it is Sale-a-Bration, so for every $50 you spend, you can choose a free item.  Contact me for more info or a catalog.


Now for the details...
Score the 5X7 piece on the short side at 3/4", 2 1/4", 3", and 4 1/2".

On the long side, score at 3/4", 1 1/2", 5 1/2", and 6 1/4".

Cut away the corners on the side with the 4 1/2" score facing you.  Then snip the other score lines.  **I will add a diagram once I get one photographed**
Next, to give it a more finished look, use a Corner Rounder Punch on the front flap, and the two flaps that fold in on the sides.  Then fold up your box! 

To make the belly band, Cut a strip of DSP 1 1/2" X 5 1/2".  Score it at 1", 1 3/4", 3 3/8", and 4 1/8".  I like to put the edges together on the top, so they are hidden by the label.

The nugget wraps are 1" X 3". Wrap them around and adhere with SNAIL on the bottom, so they can slide off and be reused.

Do you see that label?  SQUEE!!!!  We now have Framelits for the Big Shot, and coordinating stamp sets!  These labels were made with the Labels Collection Framelits and the Apothecary Art Stamp Set, available in the Occasions Mini Catalog.  I stamped the label twice, once in Pool Party, and once in Calypso Coral, punching out the circle and adding it to the Pool Party label.

I wrapped the belly band in some Calypso Coral 1/8" organza ribbon, added blossoms from the Boho Blossoms punch, and a butterfly from the Beautiful Wings Embosslits Die.  A little Fine Cosmos glitter, and voila!!!

Here's my dozen!  I had a great time making them, and had a great time trading them with some wonderful ladies that made some adorable candy swaps.  I will show them later!

I finally made it home!

Hi there!  I am (finally) home from Leadership in San Antonio.  I had a great time, until I got to the airport.  I was supposed to leave on Sunday, but between mechanical problems, and then weather, I did not get home until late Monday night.  I have not yet uploaded the 700 photos I took while there, but will do so soon!

My intention was to pre-schedule my blog-posts showing all of the swaps that I was making, but instead, I got caught up in making more swaps!  So, I will be blogging my swaps ASAP, and then follow it with all of my roommate gifts, and other goodies.... so check back in over the next few days/weeks, as I get caught up!

Thanks for looking!  And thanks for your patience!
Becky

Tuesday, January 10, 2012

Valentine's Treat Bags!

Last year, I went to Leadership Convention in Nashville, TN.  Right now I'm preparing to go in San Antonio (I leave next week!).  It is tradition to have some sort of gift for your roommates, so I decided to make my roommates each a goodie bag.  I used 2 Fancy Favor boxes, cut with my Big Shot, and stacked them.  The bottom one is Early Espresso cardstock, and the top is Early Espresso DSP from the Neutrals stack.  Each bag then had a Kit Kat, Hershey bar, Hershey w/almonds bar, Reese's PB cups, and a pack of Orbit gum.


I decorated all of the candies so the goodies could slide out.  This way they could eat the candy, and then take the sliders home and wrap them up again.  **I now know that Hershey has a policy on covering their candy items, so the bar that has just the HERS showing is against the rules...the entire logo must be covered, so now you know too!  Each bag had a tag made with the Big Shot and some chipboard.  I put their first initial on it too.  These tags came in handy when we all got our convention bags...we were able to put our tags on them to find them quickly.  I like the size of this bag, but be careful; it holds a lot!  Perhaps I'll make a few for teachers gifts this year....I know I always welcomed large amounts of chocolate when they came my way way back when I was a teacher! :)
Ingredients:  Stamp Set: Retired, and I sold it, so I don't remember...
Papers:  Early Espresso, Blushing Bride, and Very Vanilla cardstock, Neutrals paper stack, In-Colors paper stack
Ink: Early Espresso
Accessories:  Big Shot, Scallop Squares Duo die, Tasteful Trim die, Timeless Type Junior Alphabet dies, Modern Label punch, Decorative Label punch, Curly Lable punch,Scallop Edge Border punch, Designer Label punch (retired), Blushing Bride ribbon, jump rings (non-SU)


Monday, January 9, 2012

Artistic Etchings makes Masculine Valentine

Today's card, perfect for Valentines Day, is a good one for giving to that special fella in your world.  The DSP is retired, but you could substitute our Neutrals Designer Paper Stack, or our First Edition Specialty DSP (24 double-sided sheets for $12.95!)  But anyway, the special feature on this card is the ruffled ribbon...for this card I used Basic Black Satin ribbon.  I put a little SNAIL (SU's in-line adhesive) on the end of the ribbon and attach it to the back of the card.  Then, with a glue dot, make a fold and stick it down....I did this twice, adding two folds to the ribbon.  Then, because the card is black, It helps to have an insert on the inside of the card, so you can write something in.  I like this simple layout, and could probably show you about a dozen other cards with the same layout...but they look totally different because they use other colors and stamps.
                                                   
Ingredients: 
Stamps:  Artistic Etchings
Cardstock:  Basic Black, Sahara Sand, Very Vanilla, Retired DSP
Ink:  Basic Black (or Stazon Black), Sahara Sand
Accessories:  Basic Black Satin Ribbon

Friday, January 6, 2012

Valentine's Day is coming soon

Well, it seems that being back home did not help me to stick to my routine of updating my blog...  I am hoping to find my groove here soon.  I will be attending Stampin' Up!'s Leadership convention in San Antonio, and hope to come back with lots of ideas to share with you!  Today's card is inspired by a Valentine's Day card sent to me by my friend Sarah.  Sarah is a fellow paper-crafter, and also a moving mom, just like me.  I think she sent me the card a few years ago, and I liked it so well, I made up a bunch, and sent these out as my own the following year!  I would love to re-create this card, using only current SU products, but then you probably wouldn't see it for a few days, LOL.  If you have the 3 heart punch and some pretty papers, you can make this card!  I love the little oval hardware, but you can leave it off, and just stamp onto the paper if you'd like.  Keep It Simple, Sweetie!  And if you have the new Sizzix Adhesive Sheets, you can put a strip onto the back of your pretty papers, and punch them....you have stickers!  So fast!
Ingredients:  cardstock:  Naturals Ivory, Riding Hood Red
DSP:  retired, and I forget!
Ink:  Chocolate Chip (or it might be Close to Cocoa)
Stamps:  Teeny Tiny Wishes
Accessories:  3 heart punch, Large Oval punch Flowers Embossing Folder, HodgePodge Hardware (retired)

Tuesday, January 3, 2012

Angel Brayered card

I was going through some folders, and I found a bunch of cards that I had made and posted to Splitcoast Stampers over the last few years.  I know that Christmas is over, but I have several more to show!  I will save most of them to post for next year, even though several stamp sets are retired.  Today's cards feature the long retired, but well loved stamp set called On Angel Wings.  It also uses a retired stamp pad that SU used to carry...do you remember the Kaleidescope ink pads?  I still have 2 of mine, and everytime I decide I can part with them, I see these cards, and just can't let go!   The blue card is brayered straight onto a piece of glossy cardstock.  I then cut a frame out of the background, so that the layers would match up... I stamped the angel onto the center piece, and layered it onto a black piece of cardstock.  Stazon ink works best when stamping onto glossy cardstock, because it dries fast and doesn't smear...
 The tie-dyed card is done by using the Bouncing Brayer technique.  You simply ink your brayer with a kaleidescope ink pad, and then bounce it in a circle over a piece of glossy cardstock.  I again made a frame out of the entire background piece, then stamped the angel on the center piece.  I cut the frame into pieces, and layered it onto the black card base.  Doesn't it look like a stained-glass window?  I often make frames for card layouts like this to save paper, but this time I did it so the colors would match up.  The card has a few black brads for an accent, and some HodgePodge Hardware that I spray-painted black.  You can use a sharpie if you want, but my sharpie wasn't inky enough, and it looked purple.  We had some black spray paint, so I took a few pieces out and sprayed them....easy!  And they dried fast too!  The bird is white, because I stamped it onto a piece of scrap and cut it out and layered it on with a glue dot...it just didn't look right orange and purple!

Sunday, January 1, 2012

Calendar, Day 4


Happy New Year!  Today I'm showing off the final panel in the calendar.  I love these rich colors, and that Night of Navy Satin Ribbon is beautiful, the perfect touch.  Monika did a great job creating this, and it was a fun project to share with my customers last year.  I will have to find the website and print out new calendars for everyone as a little surprise to them....  May this new year be full of blessings!